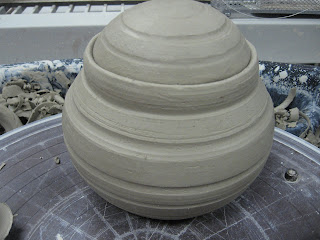
Yes, pottery fans, in this post, we are making a teapot. A teapot is just a modification of a "lidded vessel," or a pot with a lid. First, you throw the pot:

Here is the first step in making the lid. The trick here is that the lid must fit the pot. You keep measuring and adjusting, measuring and modifying, bigger, smaller, bigger again, smaller again, until you get it right. This lid only took 3 or 4 tries - sometimes, it takes a hundred attempts to get it right!

This lid is upside down: What will be the top is resting on the bat, the part that will fit into the opening of the teapot is facing us.

After the parts dried to a "leather-hard" condition, I trimmed the pot and lid, shaping it and making a pattern to suit my taste.

Next, we made spouts. You make several, so that you can choose which one will work best with your pot. I know, these look a little obscene. You should have been there when we made them. Pottery ladies have filthy minds!

Finished teapot, with spout and handles attached, drying and awaiting bisque firing. What you can't see are the small holes that I punched into the side of the pot, to allow the tea to flow through the spout. I thought we would cut out a single section where the spout attached; inside, we made a number of small holes, so the liquid will pour out while the teabags will remain behind. Neat idea, huh?

I'm really happy with the overall shape of this piece. It is balanced and the lid looks like it belongs to the pot. The spout is graceful and in the right place. The handle is... OK. Still having a hard time with that.
 Bisque fired and ready for glazing. We have moved from the studio to my dining table. With paint-on glazes, I can do this step at home, and save studio time for work that has to be done there. Plus, I am in a bit of a crunch to get this piece done.
 My work area, at the end of glazing (not enough hands to glaze and photograph at the same time.) Please note the paint brush holder. Yes, it is one of my pots. When you don't know what to do with a pot, stick something in it.
 All done except the final firing. This glaze is called "Forest Satin." At least it looks green before firing; my "blue rutile" is reddish brown when first applied. Glazes are so weird.
Here is the finished piece:


1 comment:
Wow! You are really getting good at this pottery thing. I love the teapot.
Post a Comment